Buying a 7 Pin Trailer Socket for international trailer production is not a simple plug-and-play decision. Regional wiring layouts can differ, even when the socket looks identical. A reliable purchase begins with the correct pin configuration, vehicle compatibility, and clear technical documentation.
RV electrical safety educator Mike Sokol puts it plainly: “A bad ground can make a good circuit look broken.” That warning matters in real use. A loose ground may cause dim lights, intermittent brakes, or confusing test results. Buyers should examine terminal quality, copper contact thickness, sealing performance, and strain relief. Small details matter.
Think beyond the catalog photo.
The seven key checks include wiring standards, housing material, contact protection, current capacity, weather resistance, installation fit, and supplier support. A socket made from impact-resistant nylon may survive vibration better than brittle plastic. Tin-plated terminals can help resist oxidation near coastal roads. However, no coating replaces proper sealing and careful installation.
Global buyers also need samples before placing large orders. Test the 7 Pin Trailer Socket with the intended tow vehicle, trailer harness, lamps, and brake controller. Check fit after repeated connection cycles. Ask for pin diagrams, test reports, production tolerances, and packaging details. Frankly, many product pages remain too vague. That should make buyers pause, not guess.
A lower unit price can become expensive after field failures, returns, and delayed shipments. The best choice balances electrical performance, environmental durability, documentation, and dependable communication. Yet even experienced buyers can overlook one detail: the socket must match the complete towing system, not just the vehicle connector.
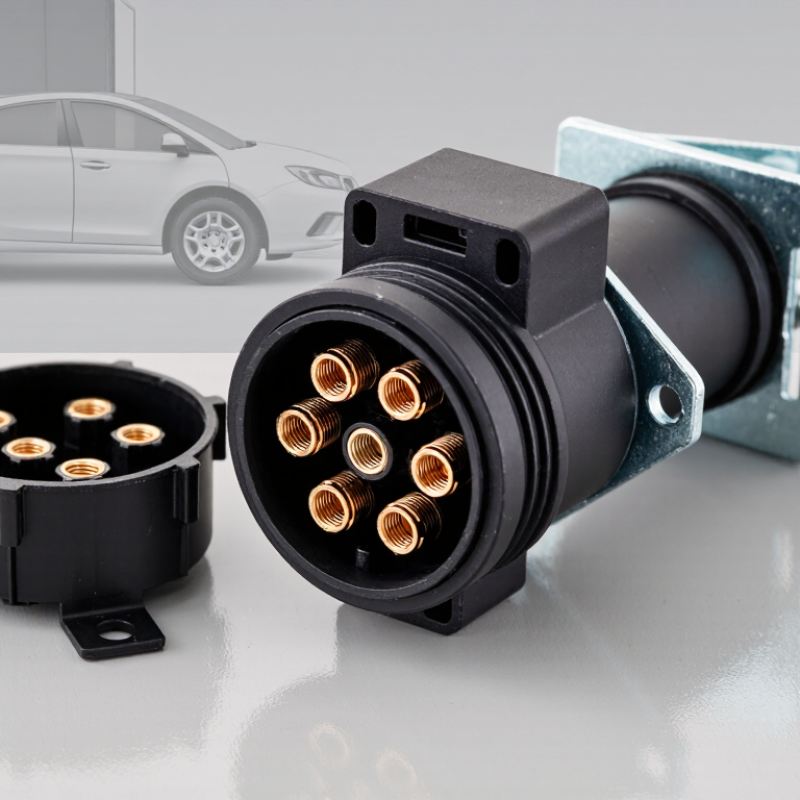
7 Pin Trailer Socket Buying Tips for Global Buyers
Identify your trailer’s towing needs before choosing a 7 pin trailer socket. A socket may fit physically but still fail electrically. Check whether your trailer uses tail lamps, indicators, brake lamps, reverse lights, or a dedicated charging line. Confirm the vehicle’s voltage, towing module, and wiring capacity. Do not assume every seven-pin layout is identical.
Regional standards can change pin assignments, contact shapes, cable colors, and testing requirements. A socket designed for one market may connect poorly with a trailer from another region. Compare the vehicle manual, trailer plug diagram, and local certification information. This simple check prevents crossed signals and unexpected lighting faults. Measure carefully.
In practical inspections, I look for sealed contacts, firm locking, strain relief, and protection from road spray. Salt, mud, and repeated twisting can damage exposed terminals quickly. Choose materials suited to the climate and towing frequency. Heavy agricultural use needs stronger protection than occasional highway towing. Leave room for inspection. Even a well-built socket can fail when wiring is loose, overloaded, or poorly grounded. Some buyers focus only on pin count, and that is an easy mistake. Check compatibility before price.

Identify your trailer’s towing needs and regional standards before selecting a 7-pin socket. The chart compares commonly assigned circuits in three regional connector systems.
Circuit availability is based on common pin assignments for ISO 1724 12N in Europe, the 7-way RV blade system in North America, and AS 4177.5 in Australia. Always confirm vehicle voltage, braking requirements, auxiliary-power demand, and local regulations before purchase.
Choosing a seven-pin trailer socket requires more than counting the contacts.
The layout must match your towing vehicle and trailer plug. Similar-looking sockets may assign different pins to lighting, auxiliary power, or ground. I have seen wiring diagrams appear identical, yet the ground position differed.
That small mistake caused unreliable lights.
Check the pin layout with a verified diagram before purchasing. Confirm each function: left indicator, right indicator, tail lights, brake lights, fog light, reverse light, and ground.
Some systems replace one lighting function with an auxiliary circuit. Do not rely on wire colors alone. Color standards can vary between manufacturers and regions. Use a multimeter to trace each circuit.
Voltage matters.
A socket designed for a 12-volt system may not suit a 24-volt towing setup. Read the vehicle and trailer specifications carefully. Then inspect the socket’s rated current, sealing, terminal quality, and mounting depth.
Moisture can enter through a loose cover. That is easy to miss. I once focused on pin compatibility and overlooked the cable exit angle, creating strain after installation.
A practical fit check should include cable routing, latch clearance, and contact firmness. Test every lighting function before the first trip, preferably with the trailer connected and safely parked. Mistakes are useful only when they change the next inspection.
Material choice affects every connection inside a 7 pin trailer socket. Look for copper alloy terminals with firm spring tension and consistent plating. These contacts resist heat buildup better than thin, poorly finished metal. A nylon or reinforced thermoplastic housing can handle vibration without becoming brittle. Check the operating temperature range before buying for desert roads or winter transport.
Weather protection deserves close inspection. A useful socket should include a tight cover, flexible gasket, and sealed cable entry. Look for a verified ingress rating, not only the word “waterproof.” Road spray can enter through a small gap. Salt, mud, and repeated washing expose weak seals quickly. Silicone or EPDM seals usually remain flexible longer than inexpensive rubber. Still, seals can deform when the lid is forced shut.
Durability also depends on installation details. Choose terminals that accept the intended wire size and include strain relief. The cable should not pull directly on the contact points. During practical checks, rotate the plug repeatedly and inspect for looseness, cracking, or heat marks. Small flaws matter. Vibration is relentless. A heavier socket is not automatically stronger, and this is where buyers can misjudge value. Ask for corrosion testing, temperature data, and cycle-test evidence. If the seller provides only attractive photographs, keep looking.
7 Pin Trailer Socket Buying Tips for Global Buyers
Confirm Vehicle Compatibility and Installation Requirements
Before buying a 7 pin trailer socket, check the vehicle’s wiring diagram and towing manual. Socket layouts can differ across regions and vehicle models. Matching the pin count alone is not enough.
Confirm the connector shape, rated voltage, current capacity, and available circuits. Check whether the vehicle supports trailer brakes, rear lights, reverse lights, or an auxiliary power line. Some vehicles require a dedicated control module, while others use direct wiring. Do not rely on wire colors. They are not universal. A multimeter and a pinout chart provide safer confirmation.
Installation details matter equally. Disconnect the battery before touching vehicle wiring. Route cables away from exhaust heat, sharp edges, and moving suspension parts. Use sealed cable entries, flexible conduit, and proper strain relief near the socket. Each circuit should have suitable protection based on the vehicle manufacturer’s instructions. An incorrect fuse can create a serious failure.
During practical fitting, test every pin with a trailer tester and a multimeter. Check the earth connection under load, not only at rest. I once assumed a clean-looking ground was reliable; it failed after moisture entered the joint. That mistake was avoidable. Allow extra cable length for movement, but avoid loose loops that can catch debris. Local installation standards may also require specific socket height, lighting functions, or braking connections. Verify those requirements before drilling or final wiring.
7 Pin Trailer Socket Buying Tips for Global Buyers
Certifications should match the destination market, not simply appear on a supplier’s website. Ask for current test reports, certificate numbers, issuing laboratories, and the exact socket model covered. Check ratings for voltage, water resistance, temperature range, and contact durability. A seven-pin socket may fit mechanically but still fail local conformity requirements.
Supplier reliability needs practical evidence. Request production samples from the same line used for bulk orders. Inspect brass contacts, terminal labels, cable seals, and strain relief under repeated movement. Review factory inspection records and batch traceability. A video call can reveal useful details, but it cannot replace an independent audit. I once trusted polished documents too quickly. That was careless.
Compare total cost, not unit price. Include tooling, packaging, freight, customs charges, testing, warehouse storage, and possible replacement claims. A socket priced two dollars lower may use weaker springs or thinner seals. Moisture can then cause intermittent lighting faults during a long journey. Ask about minimum order quantity, lead time, spare parts, and warranty handling. Calculate cost per usable unit after defects, not cost per shipped unit. Small details matter.
| Buying Tip | Key Specification to Compare | Relevant Standard or Verification | Practical Benchmark | Estimated Cost Impact | Recommended Buyer Action |
|---|---|---|---|---|---|
| 1. Confirm the correct 7-pin wiring system | Pin count, pin layout, circuit function, voltage, and wiring diagram | ISO 1724 is the common 7-pin 12N arrangement for lighting functions in many European applications. SAE J560 is a different 7-way heavy-duty system and should not be treated as interchangeable. | ISO 1724 circuits normally include left indicator, rear fog lamp, ground, right indicator, right tail lamp, stop lamps, and left tail lamp. | Incorrect compatibility can create replacement, rewiring, and return costs of approximately US$10–50 per unit. | Request the pinout drawing, mating-plug reference, and voltage rating before approving a sample or purchase order. |
| 2. Check electrical capacity and contact quality | Rated voltage, current per contact, terminal material, plating, wire cross-section, and resistance | Ask for a product datasheet and test report covering contact resistance, temperature rise, dielectric strength, and insulation resistance. | Commercial products commonly support 12 V or 24 V systems. Current ratings vary by design; many products specify approximately 10–20 A per contact, subject to temperature and wire size. | Higher-grade terminals and plating may add about US$0.30–1.50 per socket but can reduce heating and premature failure. | Compare the declared rating under actual ambient temperature and cable size instead of relying on a generic “heavy-duty” description. |
| 3. Verify environmental protection | Sealing method, cover design, corrosion resistance, operating temperature, and ingress protection | IEC 60529 is used to classify IP protection. The supplier should provide the test basis and clarify whether the rating applies to the assembled socket, connector, or housing only. | For exposed trailer use, IP44 is basic splash protection; IP54 or higher provides better protection against dust and water ingress when correctly installed. | Improved sealing, drainage, and UV-resistant materials commonly add approximately US$0.50–2.50 per unit. | Request salt-spray, water-ingress, and temperature-cycle results. Check whether the test used the final cable, gasket, cover, and mounting arrangement. |
| 4. Compare regulatory documentation | EMC, chemical compliance, material declarations, and market-specific marking | UNECE Regulation No. 10 may be relevant where the component is part of a vehicle electrical system. RoHS and REACH documentation may be required for products supplied into the European market. Certification scope must match the actual product. | Acceptable documentation should identify the model, revision, applicable standard, laboratory or testing body, test date, and manufacturer declaration where required. | Documentation review and testing can add approximately US$500–5,000 per product family, usually allocated across the order quantity. | Do not accept an unspecific “CE certificate” as proof of every requirement. Verify the certificate number, scope, issuing body, and product model. |
| 5. Assess supplier reliability | Quality system, production traceability, inspection plan, sample consistency, and corrective-action process | Request an ISO 9001 certificate where applicable, an incoming-process-final inspection plan, lot traceability, and records for electrical and dimensional checks. | A dependable supplier should provide a controlled drawing revision, batch or date code, pre-shipment inspection results, and a defined response time for nonconformities. | Third-party factory or pre-shipment inspection commonly costs about US$200–600 per visit, excluding travel and laboratory testing. | Place a small trial order, perform incoming inspection, and include agreed acceptance criteria, replacement terms, and warranty conditions in the purchase contract. |
| 6. Calculate total landed cost | Unit price, tooling, packaging, freight, insurance, duty, tax, inspection, failure rate, and inventory cost | Use the applicable customs classification and destination-country import rules. Confirm whether the quotation is EXW, FOB, FCA, CIF, or DDP. | For planning only, a basic 7-pin socket may be quoted around US$1.50–5.00 per unit, while sealed or pre-wired versions may be approximately US$4.00–12.00 before freight, duty, and tax. | Freight, duty, and inspection may add roughly 10–40% to the product price depending on shipment size, route, and destination. | Compare landed cost per accepted unit, not only the quoted unit price. Include expected rejects, warranty replacements, and compliance expenses. |
| 7. Validate installation and after-sales support | Mounting dimensions, cable exit, strain relief, terminal access, installation instructions, warranty, and spare-part availability | Check the approved mechanical drawing, mounting-hole pattern, cable length, conductor identification, and installation torque requirements. | Common 7-pin socket bodies use a standardized circular arrangement, but housing diameter, bracket position, cable length, and connector orientation can vary significantly. | Rework caused by dimensional mismatch can cost approximately US$5–25 per vehicle or trailer, excluding downtime and service labor. | Approve a physical sample using the real mounting bracket and mating plug. Obtain a written warranty period, claim procedure, and replacement lead time. |
Note: Price ranges are indicative budgeting benchmarks in USD and vary with material, order quantity, packaging, testing, shipping route, and destination market. Certification requirements must be confirmed for the final vehicle, trailer, and country of sale.
Get in Touch
570 Alden Road Unit #10, Markham Ontario Canada, L3R 8N5
Quick Links
Featured Products
Industries